Web2-Experience in Web3-Apps
Setting up a wallet with seed phrases and properly backing them up can be a significant challenge for regular users. Remembering a password is already difficult enough, many users end up losing their seed phrases or storing their backups in an insecure manner.
In this article, we'll show you how to set up an alternative authorization method using the services of Web3Auth.
This service provides a non-custodial way of storing private keys by splitting them so that access can be claimed using social credentials.
You can read more about key management on the Web3Auth website:
https://web3auth.io/docs/overview/key-management/ (opens in a new tab).
Setup Web3Auth
To get started, sign up for an account at https://dashboard.web3auth.io (opens in a new tab).
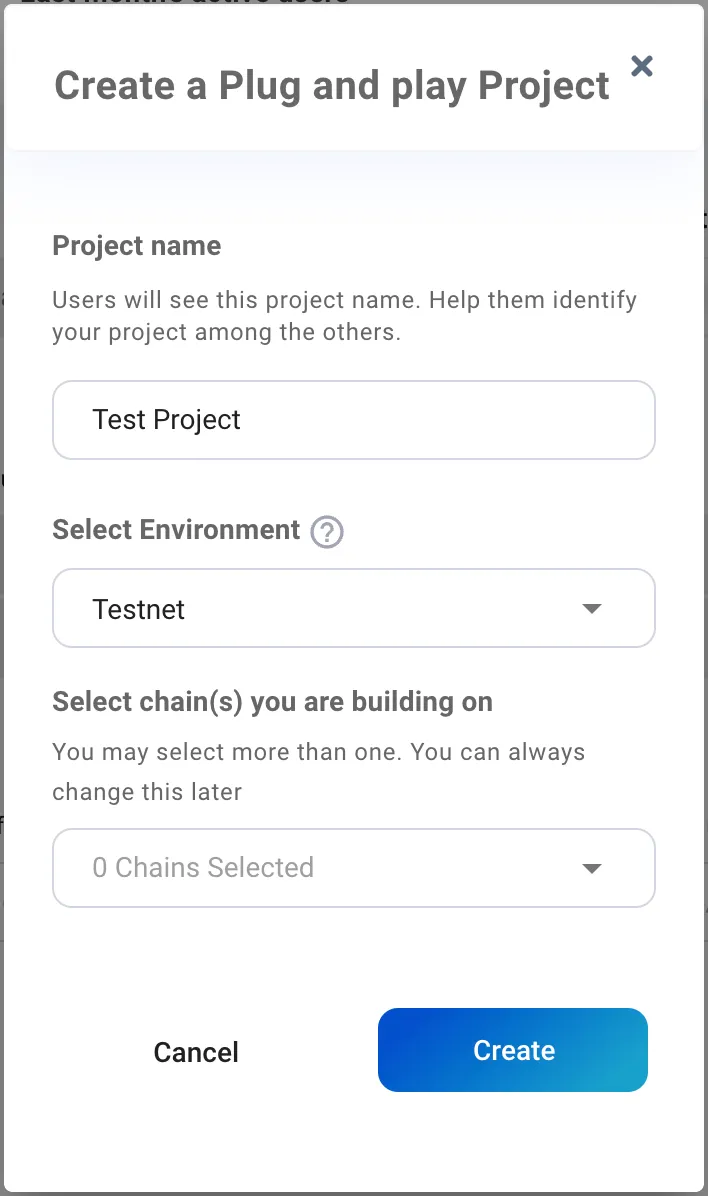
Then, create a project in the "Plug and play" section. All you need is a project name and environment.
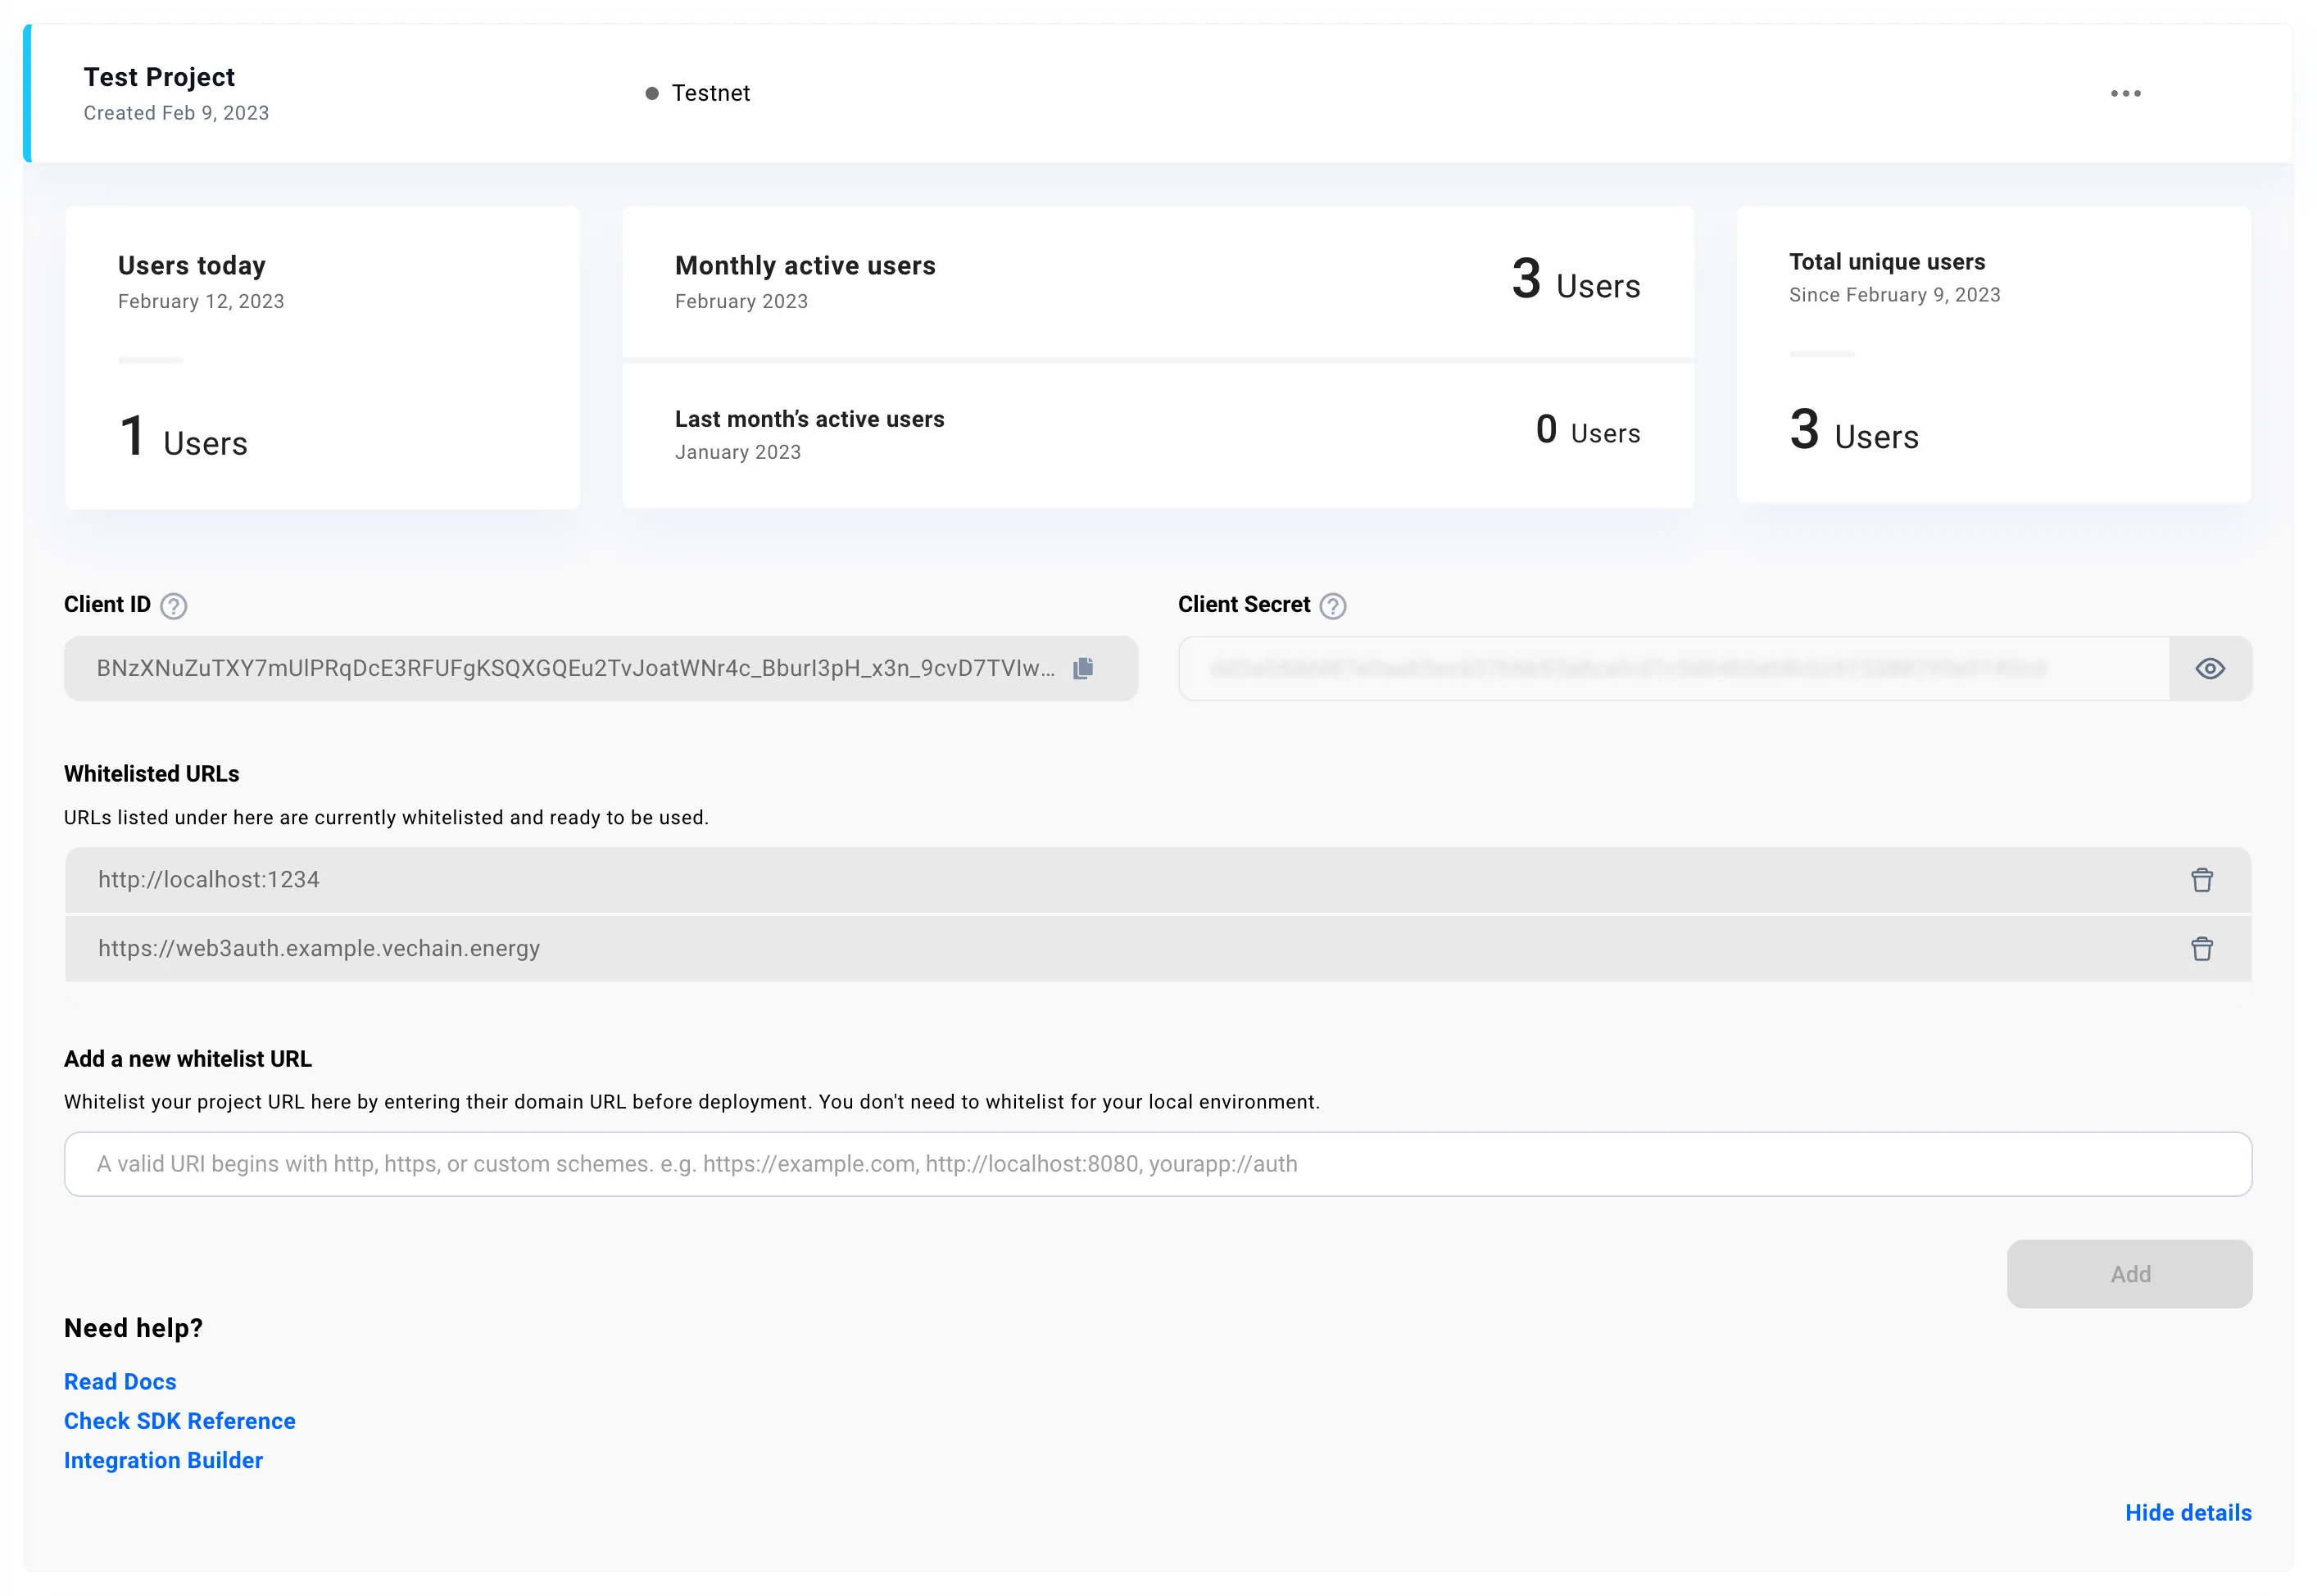
Next, copy the Client ID and add the URL to the whitelist you'll be using during development. For example, http://localhost:3000 is normally used for React, and http://localhost:1234 is the default for Parcel.
Sample Project
You can access a sample project using Parcel and React from the following GitHub repository:
https://github.com/vechain-energy/openlogin-transaction (opens in a new tab)
This project contains a fully working sample that you can use to test and explore the code snippets explained below.
The following libraries are used in this project:
@vechain/connexto build the raw data for contract interaction and allow a logical fork at the latest step between Web3Auth and Connex-Signing-Service.thor-devkitto manually handle transaction signing.@vechain/ethersfor custom wallet management with a private key.@walletconnect/clientand@web3auth/modalfor the Web3Auth implementation.
Web3Auth
Initialize Web3Auth
To initialize Web3Auth, you'll need the Client ID you copied earlier. In this example, the chainNamespace must be set to "other" since VeChain is not supported. The project was set up for TestNet, so testnet is used as the web3AuthNetwork.
import { Web3Auth } from "@web3auth/modal";
import { OpenloginAdapter } from "@web3auth/openlogin-adapter";
import { CHAIN_NAMESPACES, ADAPTER_EVENTS, CONNECTED_EVENT_DATA } from "@web3auth/base";

const web3auth = new Web3Auth({
  clientId: WEB3AUTH_CLIENT_ID,
  web3AuthNetwork: WEB3AUTH_NEWORK,
  chainConfig: {
    chainNamespace: CHAIN_NAMESPACES.OTHER,
    displayName: 'VeChain',
    ticker: 'VET',
    tickerName: 'VeChain'
  },
});
Next, create a provider that provides access to the user's private key using the OpenLogin Adapter:
const openloginAdapter = new OpenloginAdapter({
  adapterSettings: {
    network: WEB3AUTH_NEWORK,
    uxMode: "redirect"
  },
});
web3auth.configureAdapter(openloginAdapter);
This setup is based on https://web3auth.io/docs/sdk/web/providers/other (opens in a new tab)
To complete the initialization the Adapter needs to be initialized once when UI is ready for the user. An effect does that:
  useEffect(() => {
    web3auth.initModal()
  }, [])
Sign In and Sign Out
The web3auth instance offers a connect() and logout() functionality that initiate the corresponding processes:
  const handleSignIn = async (): Promise<void> => { await web3auth.connect() }
  const handleSignOut = async (): Promise<void> => web3auth.logout()
These methods can be used in a React component to trigger the sign in and sign out processes, respectively. For example:
  return (
		<div>
	    <Button block size='large' type='primary' onClick={handleSignIn}>sign in</Button>
			<Button block size='large' danger onClick={handleSignOut}>sign out</Button>
		</div>
	)
Wallet / Private Key Access
To get access to the wallet's private key, an event listener for the CONNECTED event of the web3auth adapter can be used. The example stores the private key in the component's state:
const subscribeAuthEvents = (web3auth: Web3Auth) => {
    web3auth.on(ADAPTER_EVENTS.CONNECTED, (data: CONNECTED_EVENT_DATA) => {
      console.log("connected to wallet", data);

			// Store Private Key in State
      if (web3auth.provider) {
        web3auth.provider.request({ method: "private_key" })
          .then(privateKey => setPrivateKey(String(privateKey)))
      }

    });
  };

  useEffect(() => {
    subscribeAuthEvents(web3auth)
  }, [])
This event listener listens for the CONNECTED event and retrieves the private key from the web3auth adapter. The private key can be used to sign transactions and interact with the blockchain.
Transaction
With the help of thor-devkit transactions an be built and signed using a private key. The snippet will also use fee delegation to make the transactions gasless too.
Create Transaction Instance
	import { Transaction, secp256k1 } from "thor-devkit";

  const transaction = new Transaction({
    chainTag: Number.parseInt(connex.thor.genesis.id.slice(-2), 16),
    blockRef: connex.thor.status.head.id.slice(0, 18),
    expiration: 32,
    clauses,
    gas: 30000,
    gasPriceCoef: 128,
    dependsOn: null,
    nonce: +new Date(),
    reserved: {
      features: 1 // this enables the fee delegation feature
    }
  });
Get Fee Delegation Signature
With fee delegation the gas costs are removed and any new wallet can instantly interact with the network. This is a sample to get a signature from a delegation service:
  // build hex encoded version of the transaction for signing request
  const rawTransaction = `0x${transaction.encode().toString("hex")}`;

  // request to send for sponsorship/fee delegation
  const sponsorRequest = {
    origin: wallet.address,
    raw: rawTransaction
  };

  // request sponsorship
  const { signature, error } = await post(DELEGATE_URL, sponsorRequest);

  // sponsorship was rejected
  if (error) {
    throw new Error(error);
  }
Signing the Transaction
The transaction is signed with the private key of the user using secp256k1:
  // sign transaction with the known private key
  const signingHash = transaction.signingHash();
  const originSignature = secp256k1.sign(
    signingHash,
    Buffer.from(privateKey.slice(2), "hex")
  );
For fee delegation the signature from the service is added to the transactions signature too:
  // build combined signature from both parties
  const sponsorSignature = Buffer.from(signature.substr(2), "hex");
  transaction.signature = Buffer.concat([originSignature, sponsorSignature]);
Broadcast Transaction
Sending the transaction to the network is a single POST request to the network node:
  // post transaction to node
  const signedTransaction = `0x${transaction.encode().toString("hex")}`;
  const { id } = await post(`https://testnet.veblocks.net/transactions`, {
    raw: signedTransaction
  });
The transaction id is returned and can be used for further handling.
Conclusion
This article has shown how to set up an alternative authorization method using the services of Web3Auth, a service that provides a non-custodial way that can be claimed using social credentials.
The sample project demonstrates how to initialize Web3Auth, sign in and sign out, retrieve the private key from the Web3Auth adapter, and create an example transaction on the blockchain.
Web3Auth can be used to on-board users with a well known social sign in. In combination with Fee Delegation it allows an instant-use-experience that removes all complexity of web3/crypto from the enduser. A website with a blockchain backend will just feel like a regular website.